How to integrate DAST into your GitLab CI/CD pipeline?

With the increasing frequency and sophistication of application security threats, traditional security measures are no longer sufficient. That’s where Dynamic Application Security Testing (DAST) comes into play.
By actively scanning your applications for vulnerabilities during runtime, DAST provides real-time insights into potential security risks, empowering you to proactively mitigate threats and safeguard your digital assets.
Why do you need DAST?
In a world where web applications and APIs form the backbone of many businesses, the significance of comprehensive application security cannot be overstated.
DAST is a type of black-box security testing which analyses applications in their running state, identifying potential security vulnerabilities as they would appear to an external attacker.
It has become an irreplaceable tool in the arsenal of a lot of organization’s application security programs.
DAST enables the scanning of all web assets, regardless of their technology, and doesn’t require access to the source code. DAST is the only approach to testing that can handle the cases of template code patchworks, legacy business systems, external systems, etc.
In this article we will learn how to automate your secure deployment by integrating DAST into your GitLab CI/CD pipeline, leveraging the powerful capabilities of Beagle Security.
As a trusted leader in application security, Beagle Security offers an advanced DAST platform designed to enhance the security posture of your applications while seamlessly integrating into your existing DevOps workflows.
What is secure deployment?
Secure deployment is a set of practices and procedures aimed at ensuring that software or applications are deployed to production environments that prioritize security and minimizes the risk of security breaches or vulnerabilities.
This involves implementing measures to protect against potential threats during the deployment process and maintaining the security posture of the system after deployment.
Secure deployment extends beyond deployment mechanics by emphasizing the safeguarding of sensitive data, including passwords, tokens, and other essential secrets necessary for application functionality in production environments.
At its core, this practice involves relocating appropriate production secrets from repositories and configuration files to securely managed digital vaults.
In advanced implementations, secrets are dynamically generated during deployment, and regular procedures are in place to identify and address any instances of unprotected secrets within the environment.
What is GitLab?
GitLab is a web-based DevOps lifecycle tool that provides a complete end-to-end solution for managing the software development process.
It offers features for source code management, continuous integration and delivery (CI/CD), collaboration, issue tracking, and more, all within a single platform.
With GitLab, teams can streamline their workflows, improve collaboration, and accelerate the delivery of high-quality software.
Integrating DAST into GitLab CI/CD pipeline
Integrating DAST into your GitLab CI/CD pipeline involves automating the security testing of your application during the development and deployment process.
Here is the step-by-step tutorial for integrating Beagle Security’s DAST into your GitLab CI/CD pipeline:
1. Create a pipeline
Creating a pipeline in CI/CD involves defining a series of automated steps that execute whenever changes are made to the codebase. These steps typically include building, testing, and deploying the software to various environments.
2. Log into GitLab and select your project
Navigate to your GitLab instance and log in to your account. Once logged in, select the project where you want to integrate Beagle Security’s dynamic testing into your CI/CD pipeline.
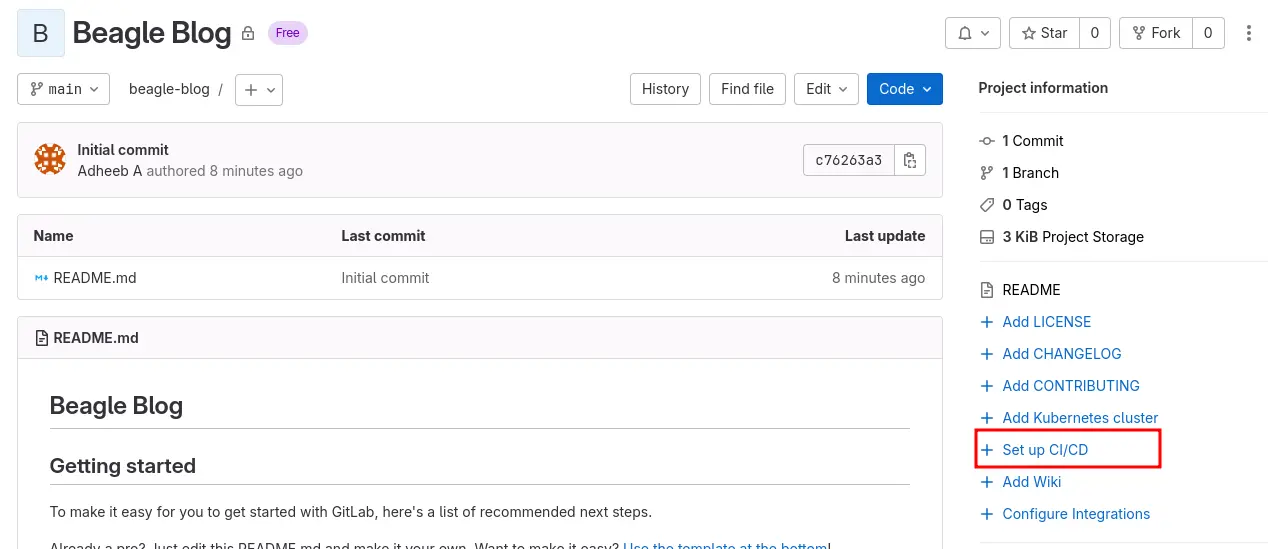
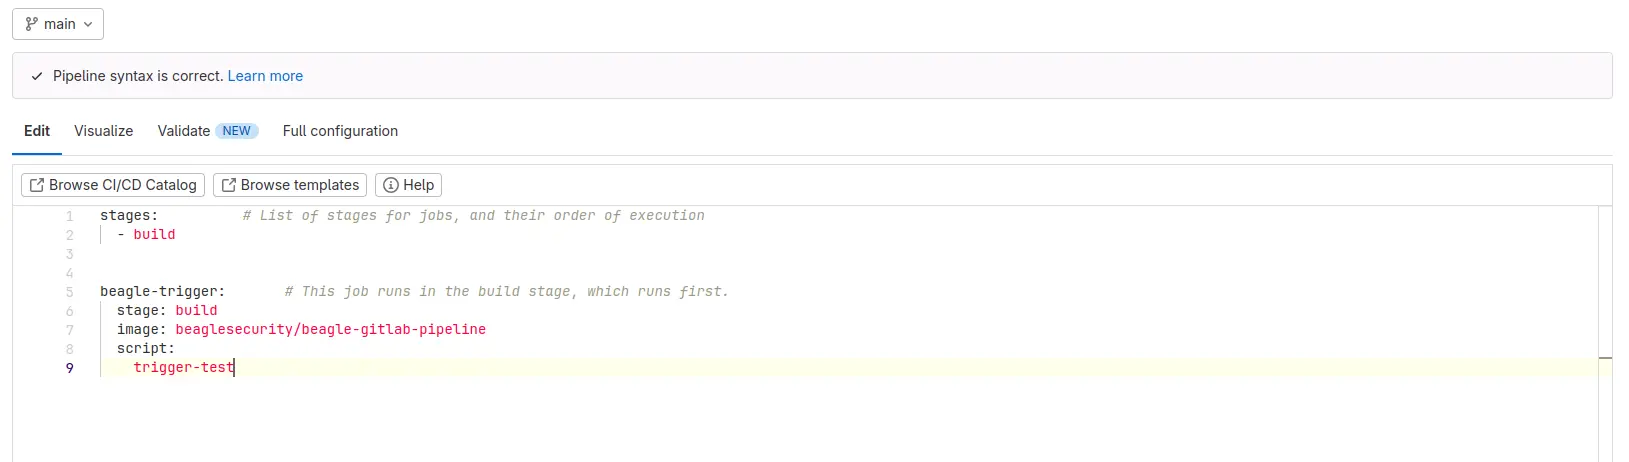
3. Configure your.gitlab-ci.yml as follows
Create or modify the.gitlab-ci.yml file in the root directory of your project.
Add the following snippet to define the Beagle Security trigger:
Stages:
   - build

Beagle-trigger:
         stage: build

        image: beaglesecurity/beagle-gitlab-pipeline
         script:
             trigger-test
This snippet configures a job named beagle-trigger using the Beagle Security Docker image. The trigger-test script triggers the dynamic testing process.
4. Add environment variables to GitLab
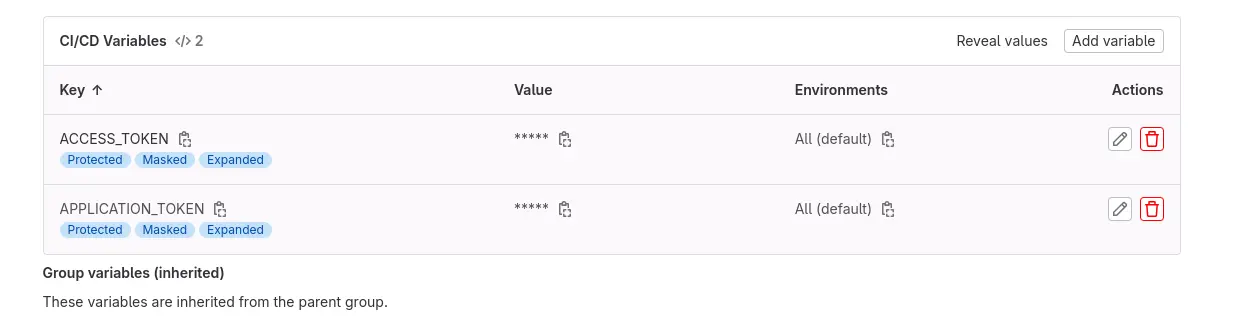
To securely manage your Beagle Security access and application tokens, add them as environment variables to your GitLab project:
Navigate to your project’s Settings.
Go to CI/CD -> Variables.
Add two variables: ACCESS_TOKEN and APPLICATION_TOKEN (Check next section for detailed steps for generating access token and application token)
Ensure the variable names are spelled correctly and match exactly.
Set the variables’ State to Protected and Masked to prevent exposure.
Click Save Variables to apply the changes.
5. Generate and copy your tokens from Beagle Security
The personal access token and application token are generated from two different places in the dashboard.
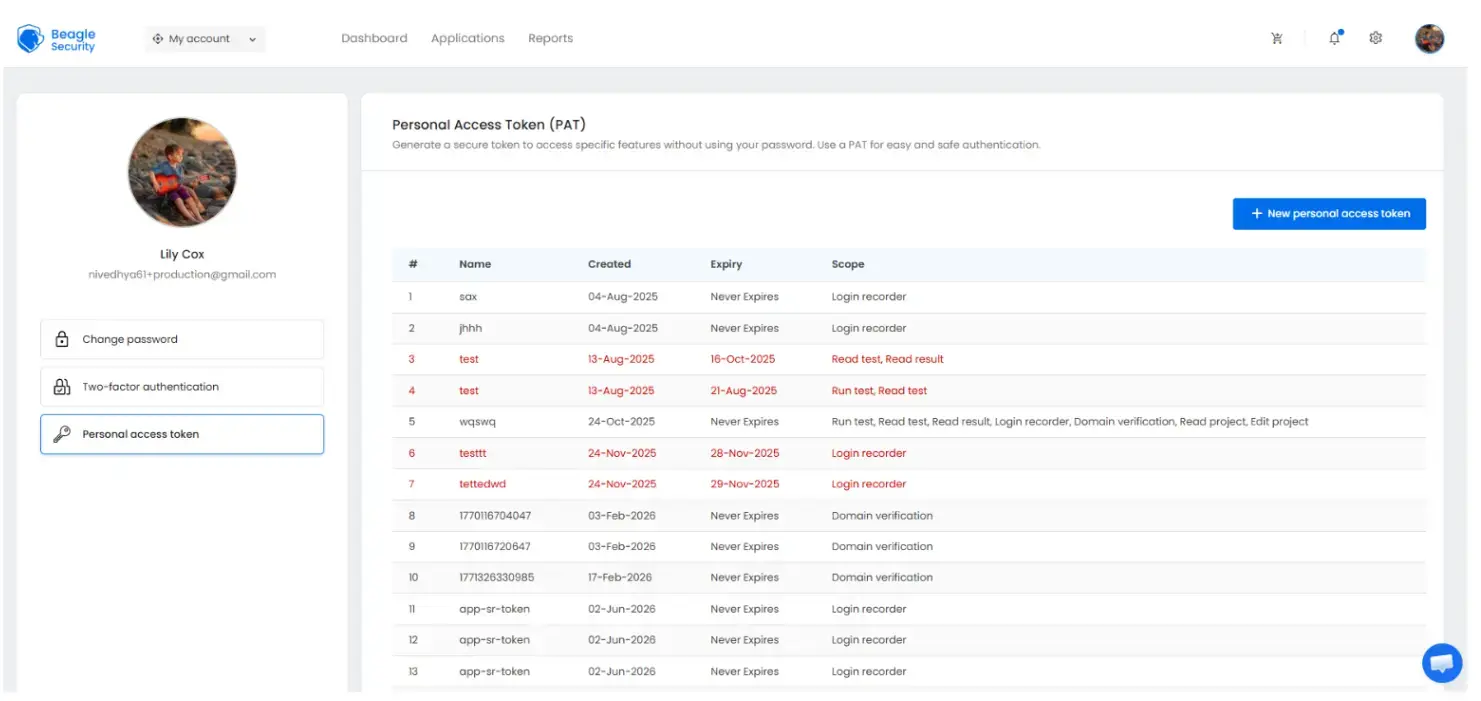
Generate the personal access token:
- Click your profile icon in the top right corner.
- Select Personal access token.
![]()
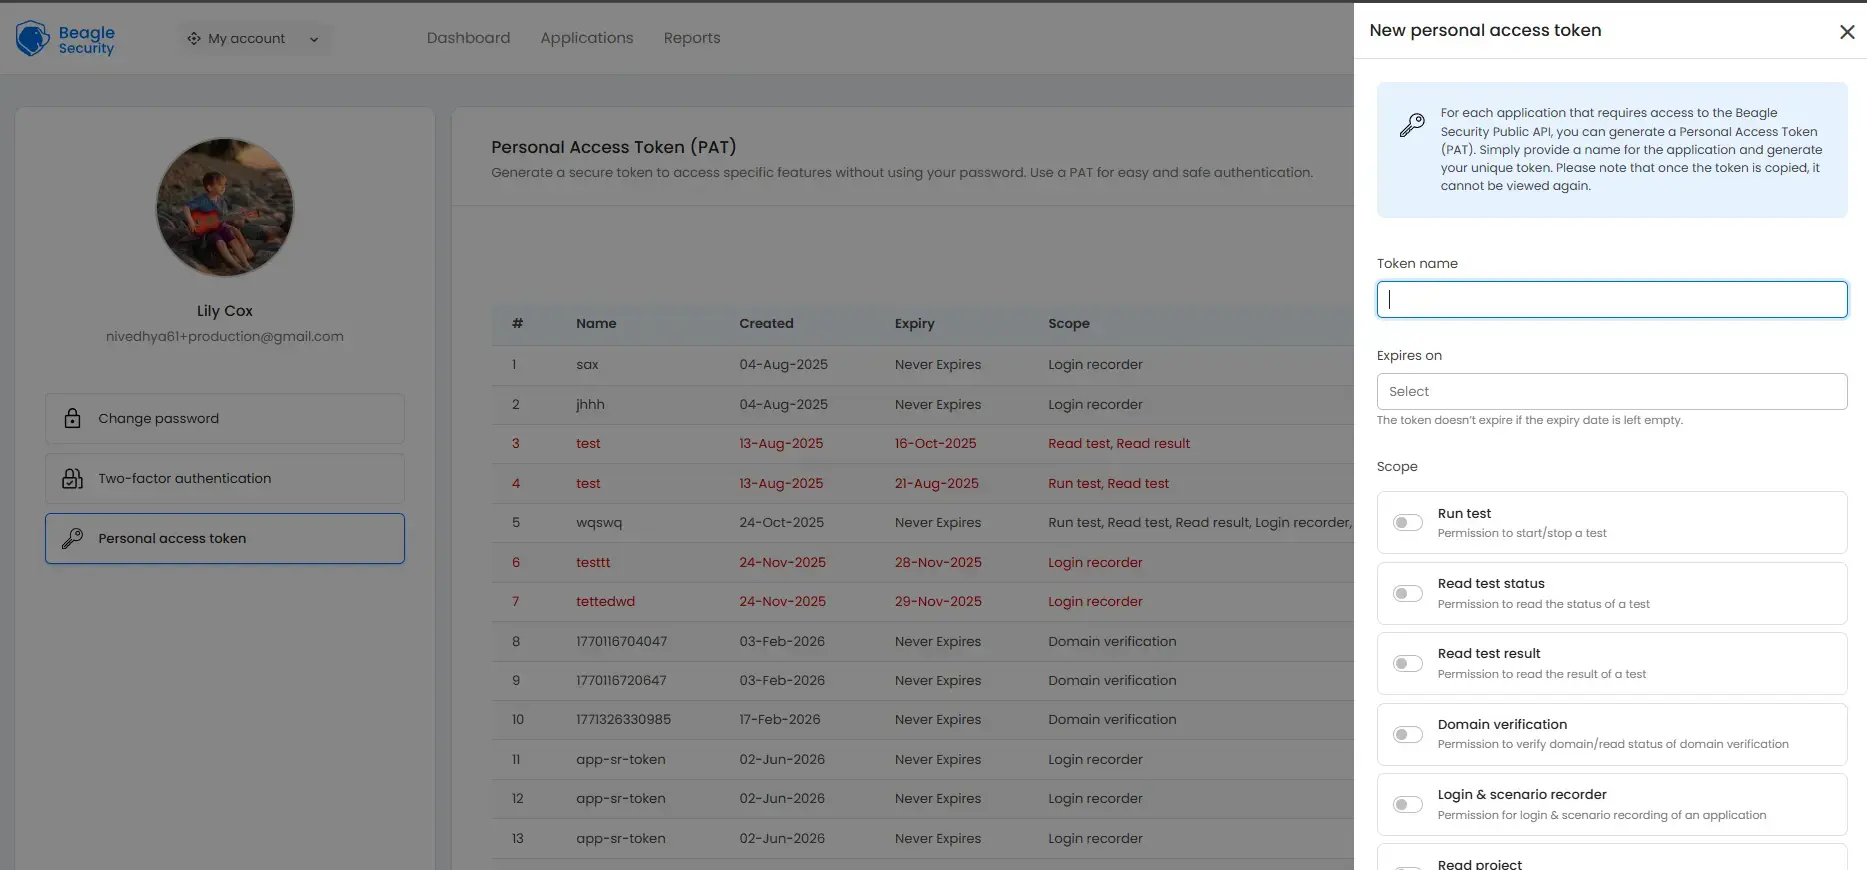
- Click New personal access token.
- Enter a token name.
![]()
- Set an expiry date if needed.
- Turn on the required scopes.
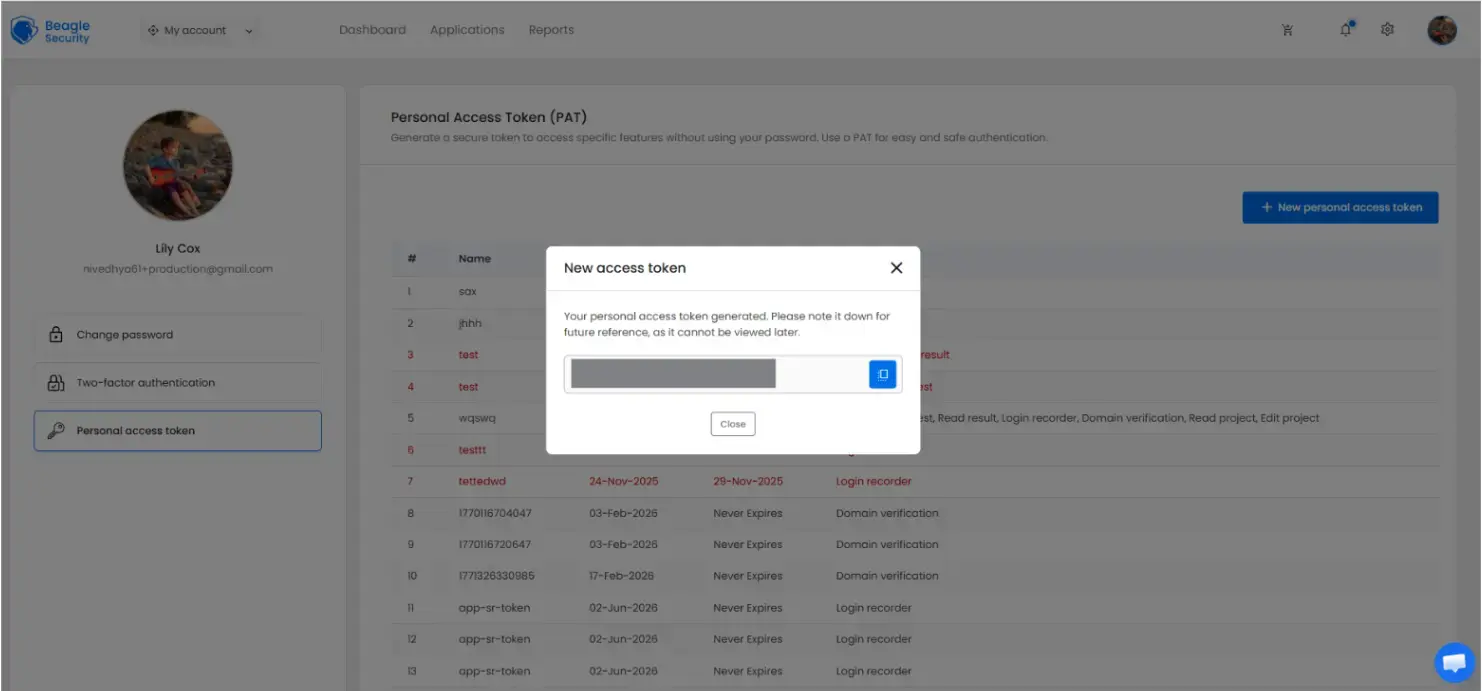
- Click on create.
![]()
- Copy the token immediately. It is shown only once and cannot be viewed later.
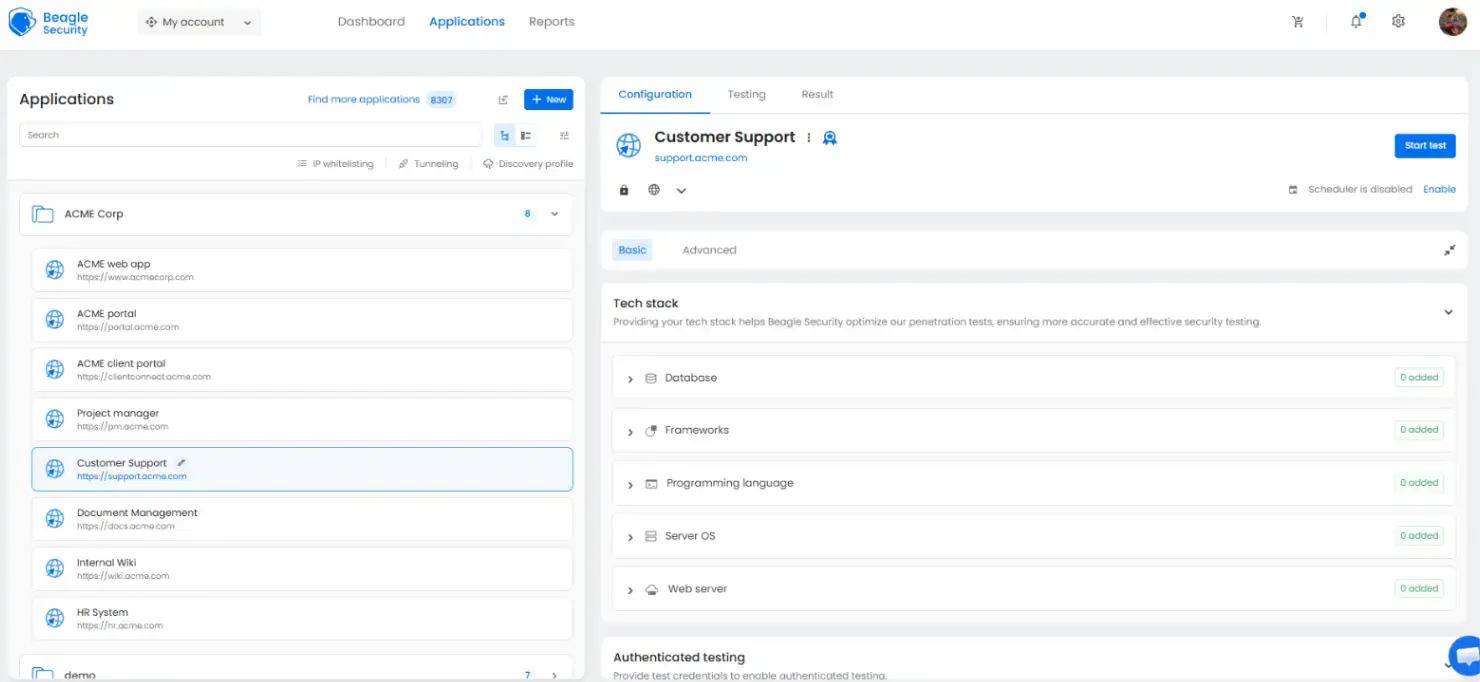
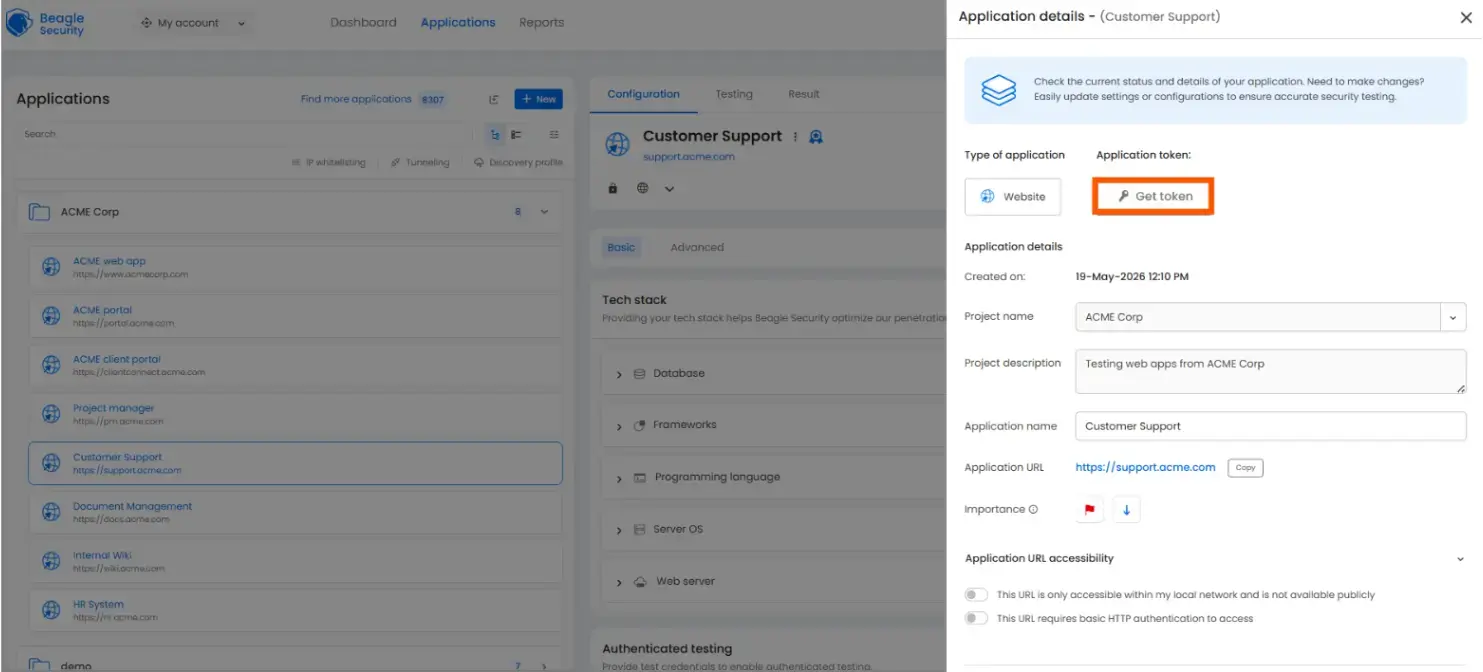
Generate the application token:
- Go to the Applications page and open your application.
- Click the edit icon next to the application name.
![]()
- Under Application token, click Get token.
![]()
- Copy the token using the Copy button.
6. Trigger the build and monitor Jobs in GitLab
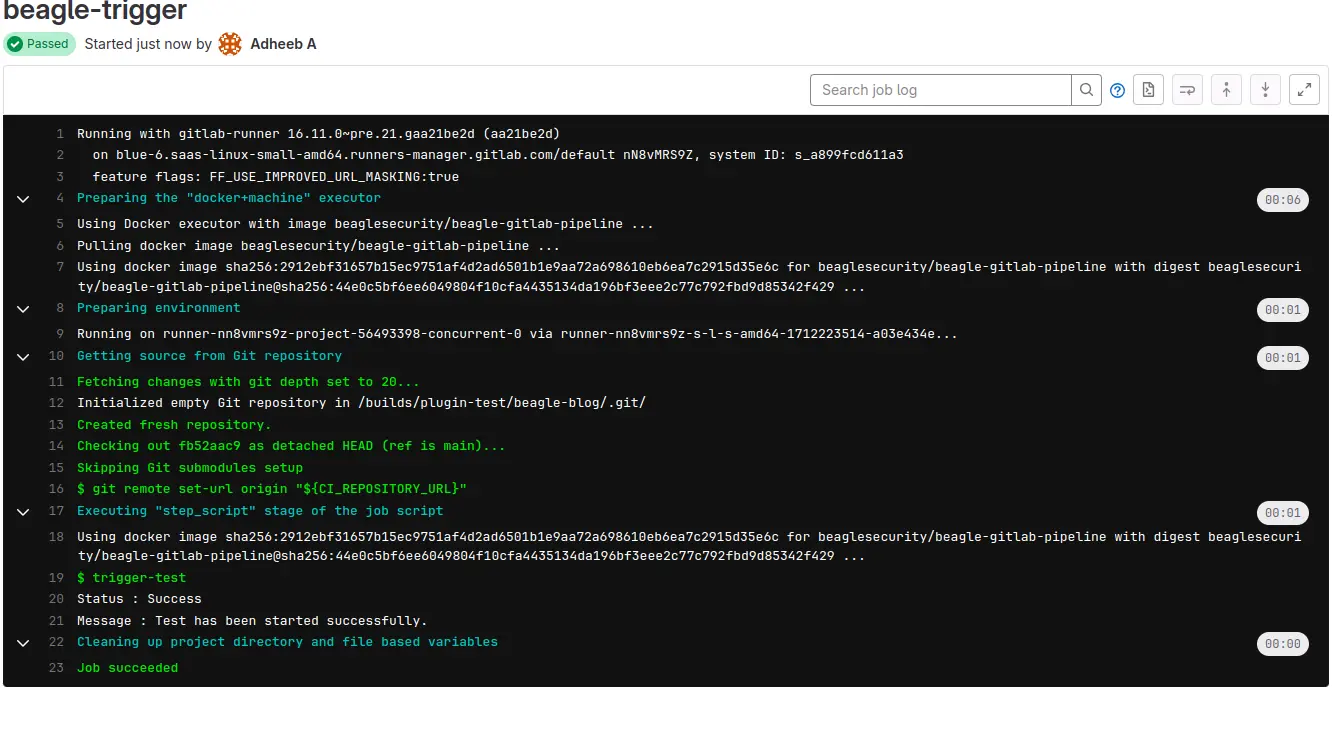
Now that your GitLab CI/CD pipeline is configured to integrate with Beagle Security, trigger a new build or push your changes to the repository to initiate the pipeline execution.
Navigate to CI/CD -> Jobs to monitor the progress and view the status of the beagle-trigger job.
7. Viewing vulnerabilities in Beagle Security after DAST
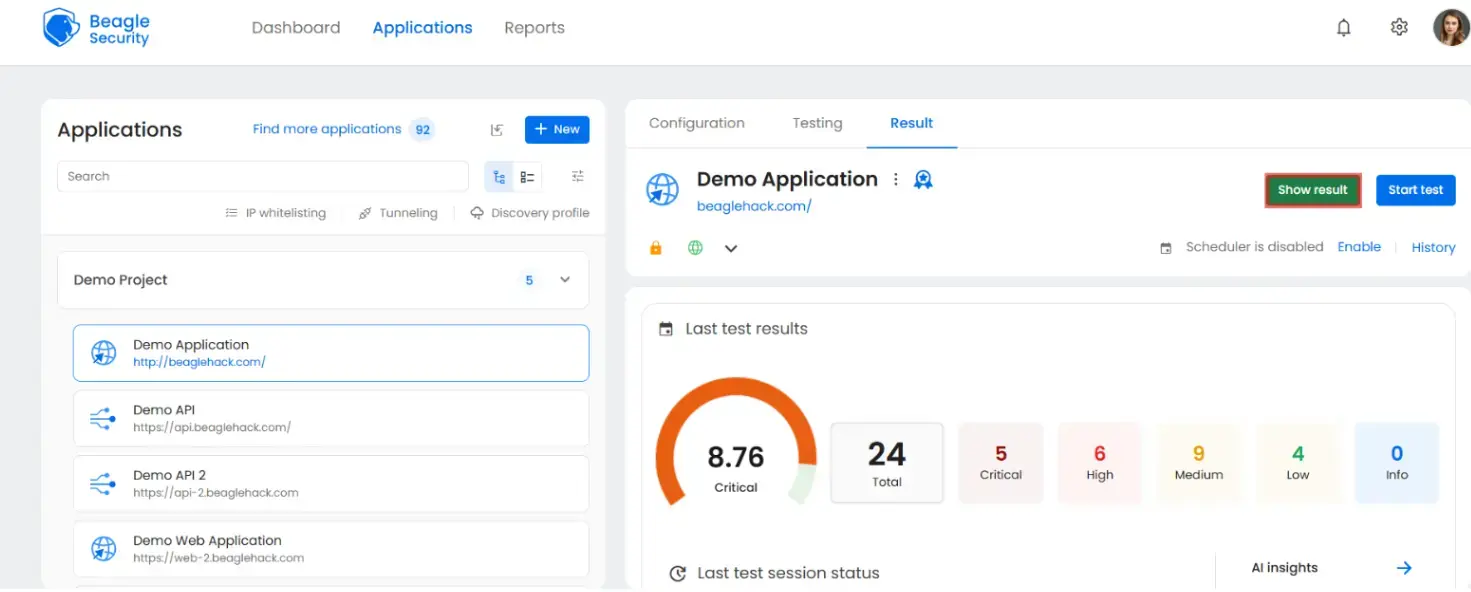
Once the DAST is completed for the GitLab CI/CD pipeline, you can view the results from your Beagle Security dashboard.
You’ll be able to see the following details in the application dashboard:
Security score of the application
Vulnerability classification based on criticality
Graphs for vulnerability catalog & vulnerability classification
OWASP Top 10 indicator mapping
Security posture of the application over a period of time
Vulnerability fixing rate graph
Past test sessions
Check out a demo application dashboard in Beagle Security.
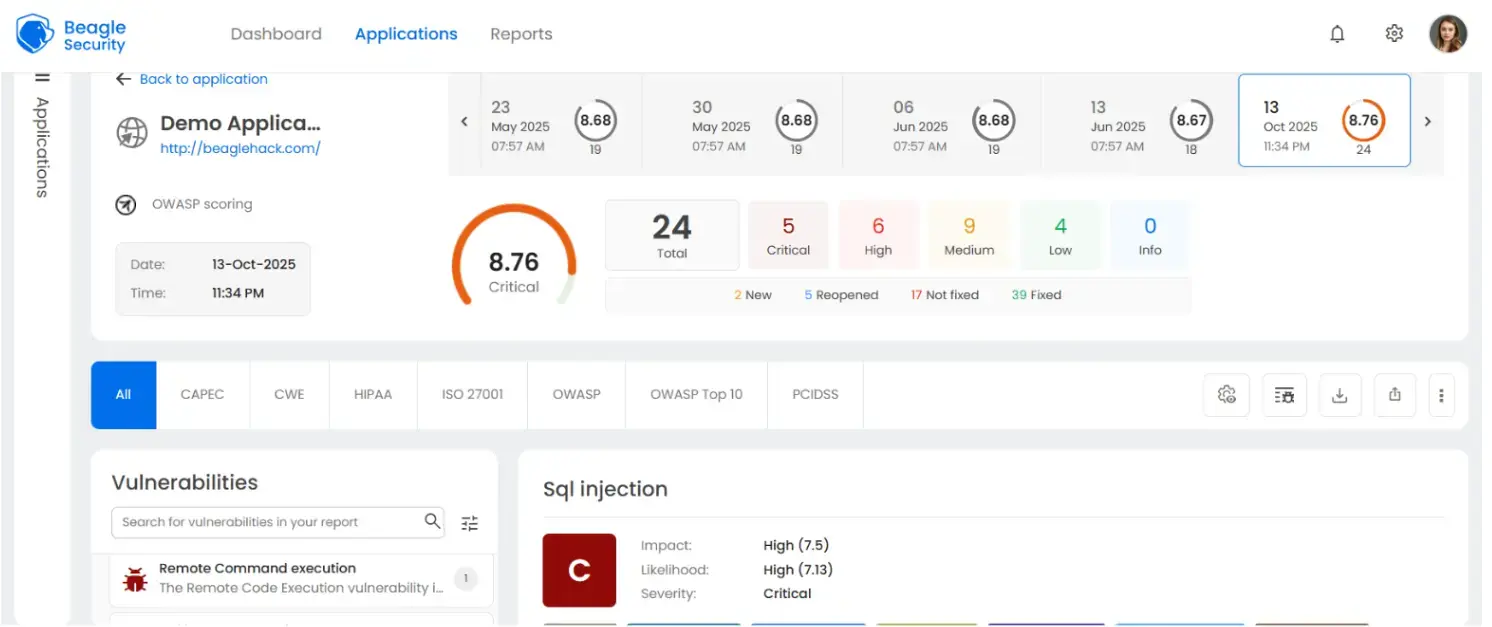
To delve deeper into the vulnerabilities you can go to the detailed results dashboard of a particular test session. The results dashboard will include the following information:
Detailed listings of all vulnerability findings
Vulnerability tags and classification for each vulnerability finding against security standards
Detailed description, contextual recommendation, proof of exploit and occurrences of each vulnerability finding
Classification of vulnerability findings against OWASP, OWASP Top 10 & CWE Top 25
You can also download these results as PDF reports against OWASP, HIPAA, GDPR & PCI DSS standards
Summing up
Integrating DAST into your GitLab CI/CD pipeline is a crucial step towards ensuring the security and integrity of your applications.
By leveraging Beagle Security, you can automate the detection of vulnerabilities throughout the development and deployment process, seamlessly integrating security into your DevOps workflows.
Beagle Security provides a comprehensive suite of features, allowing you to run agentic AI penetration tests automatically within your GitLab environment.
With DAST integrated into your CI/CD pipeline, you can identify and remediate security issues early in the development lifecycle, reducing the risk of potential breaches and ensuring that your applications are resilient against evolving threats.
By prioritizing security from the onset, you can build and deploy software with confidence, safeguarding your organization’s assets and reputation.
FAQs
Does DAST replace SAST in the pipeline?
No, SAST and DAST test different things. SAST analyzes source code without running the application, it catches insecure coding patterns early. DAST tests the running application from the outside. It finds vulnerabilities that only appear at runtime, like authentication flaws, injection points, and misconfigured headers. Both belong in the same pipeline at different stages.
When should I use DAST?
DAST is particularly effective during the pre-production and production stages, where it can identify vulnerabilities that only emerge when the application is running in its real-world environment. This ensures full security coverage, addressing potential issues that static analysis alone may not detect.








![Top 10 SDLC tools [2025]](/blog/images/blog-banner-three-cover.webp "Top 10 SDLC tools [2025]")