
If your team has been building APIs for any length of time, you probably already have a Postman collection that works. Endpoints are documented, requests are organized, authentication is set up, and everyone’s been using it to debug and test for months.
Then someone kicks off API security testing and the first thing that happens is rebuilding all of that from scratch inside a different tool.
Endpoints get re-entered manually, tokens get reconfigured, and environment variables stop working for no obvious reason. More often than not, the scan ends up running without proper authentication, which nobody catches until the results come back looking suspiciously clean.
This guide is about skipping that entire process.
Instead of starting over, you’ll see how to bring your existing Postman collection directly into Beagle Security, a dedicated API security testing platform, to configure authentication the right way, handle environment variables without breaking things, and avoid the small setup mistakes that quietly make your scans incomplete.
Why are Postman collections a natural starting point for API security?
A Postman collection already contains most of what a security scanner needs. The requests are structured, endpoints are grouped, variables are referenced across calls, and the authentication setup usually reflects how the API actually behaves in production.
Most API security tools don’t use any of that. They expect you to recreate the API from scratch before testing can begin, one endpoint at a time. That’s slow, and it creates room for small mistakes that affect your results without being obvious. It could be as simple as a missing header, an outdated endpoint, or authentication that isn’t configured quite right.
Importing the existing collection skips that entirely. The scanner works from the same request structure the development team already uses, so the endpoints are right, the auth is right, and the variables are already in place. That’s a faster path to a scan that actually reflects your API than rebuilding everything separately.
How to import your Postman collection into Beagle Security?
Postman is already part of the workflow for a lot of API teams, especially during development, debugging, and endpoint validation. The integration process in Beagle Security is built around using that existing setup directly instead of rebuilding the API manually again for security testing.
Here’s how the setup works.
Open the API configuration section
Inside the Beagle Security dashboard, navigate to Applications, and select the application you want to test.
From there:
Open Configuration.
Go to the API tab.
Select Postman integration.
Generate a Postman API key
Beagle Security uses the Postman API to pull collections and environments directly from your workspace, so you’ll need a Postman API key first.
Inside Postman:
Open Settings.
Click API keys.
Select Generate API keys.
Give the key a name.
Generate and copy the API key.
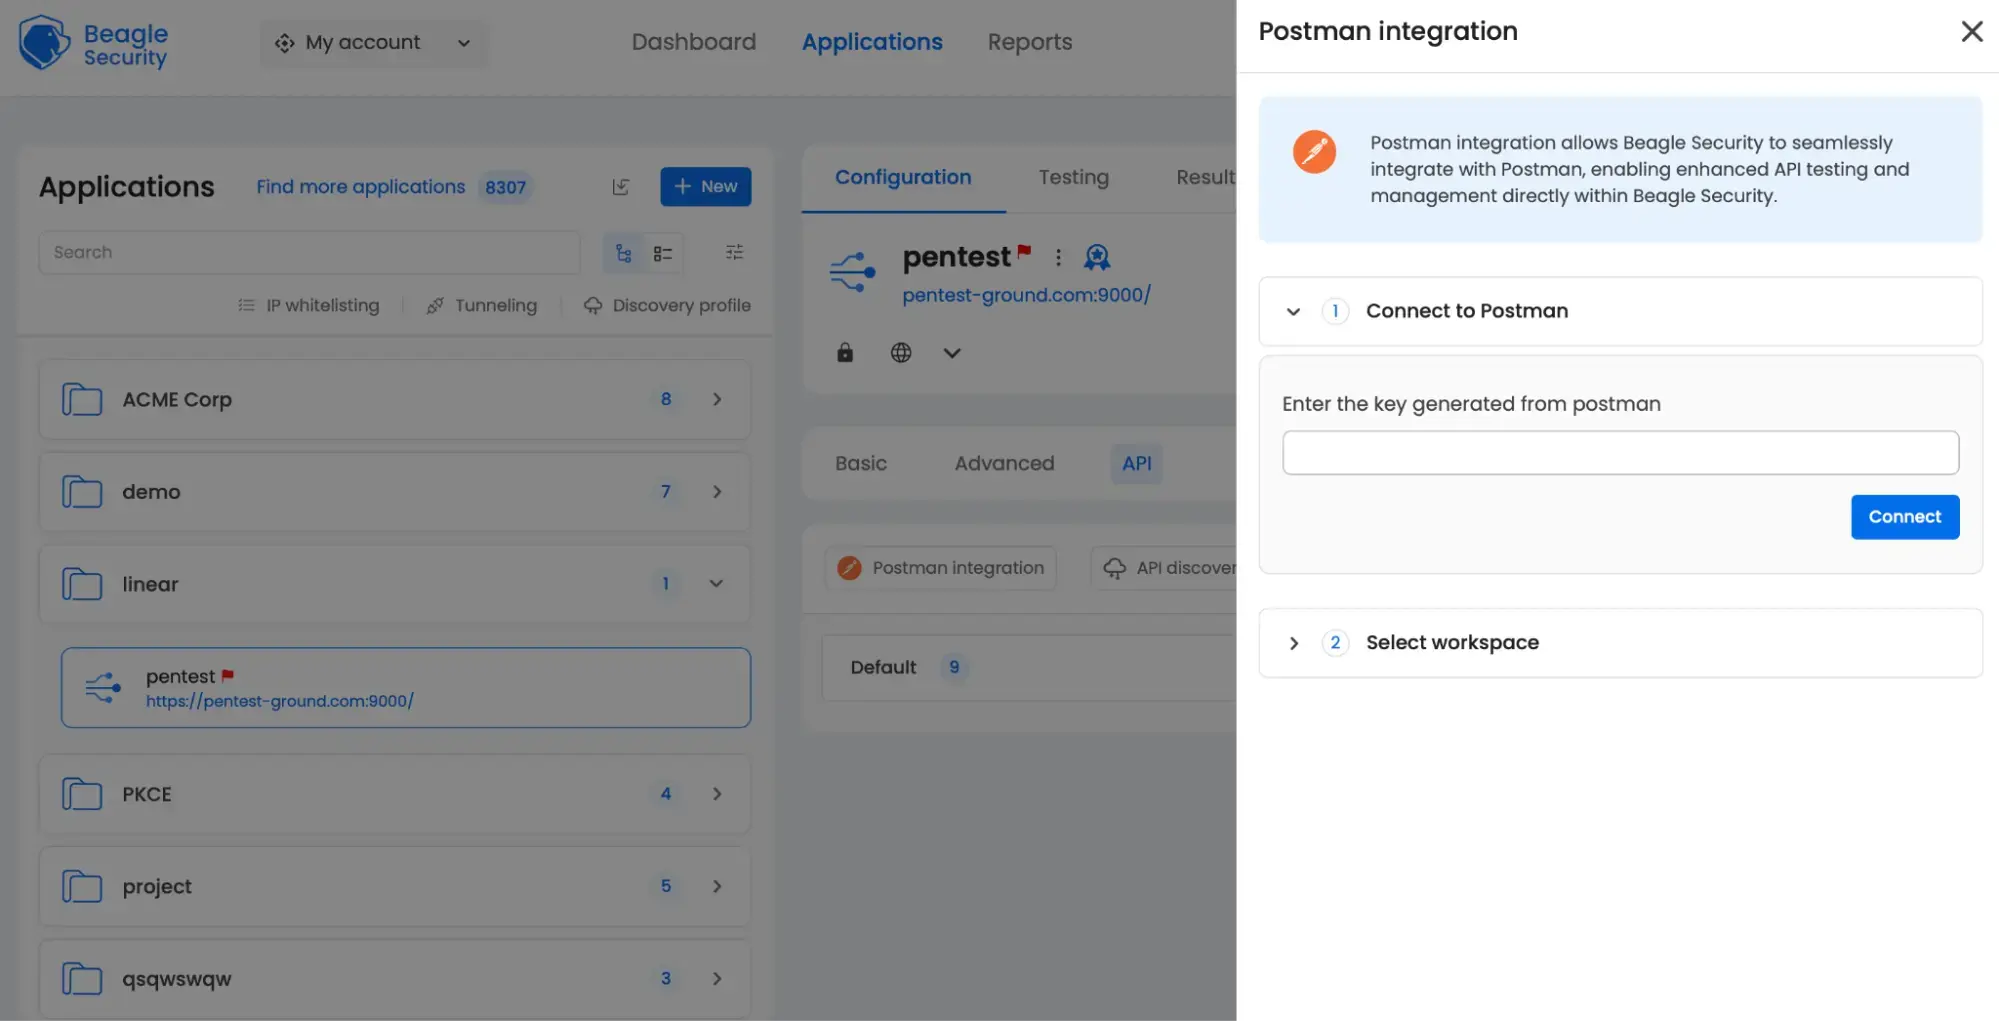
Connect Postman to Beagle Security
Paste the Postman API key into the provided field inside Beagle Security and click Connect.
Once the connection is successful:
Choose your workspace from the available dropdown list.
Select the collection you want to scan.
Optionally, select the matching environment if the collection depends on environment variables.
After that, click Integrate to complete the setup.
What happens to your environment variables & authentication headers on import?
This is where most imports quietly break. The collection comes in fine, everything looks correct, and then the scan runs against endpoints that are either unreachable or only partially authenticated.
Beagle Security syncs with your Postman environment directly, so the request structure and variables come across during import. Base URLs, tokens etc, all of it maps into the test configuration. Without those resolving correctly, requests fail silently or hit the wrong endpoints.
Authentication needs a manual check after import. Expired tokens, missing environment values, or auth configured inconsistently across individual requests won’t fix themselves on import.
Don’t run a full scan before verifying authentication is actually working. If it isn’t, the results won’t reflect much.
Configuring authentication for your API test
Authentication configuration is usually the difference between a useful API scan and a scan that only touches public endpoints. Most setup issues happen here. The collection imports correctly, the requests exist, but the scanner either loses authentication halfway through or never reaches protected endpoints in the first place.
Bearer token configuration
The quickest way to get authentication working across your entire test is to set a default authorization in Beagle Security. Go to your API configuration, click Set up Default Authorization , choose Bearer Token , paste your token, and save.
On token expiry, if your token expires mid-scan, requests start failing silently and the results get unreliable. The cleaner fix is to switch to OAuth 2.0 instead of bearer token. Beagle Security supports it, and it handles token refresh automatically so you’re not chasing expiry issues mid-test.
Role based authorization
If your API behaves differently depending on who’s calling it, like an admin versus a regular user, for example, a single token won’t cover everything. Beagle Security handles this through role based authorization, which lets you configure separate credentials per role and assign specific endpoints to each one.
To set it up, go to the role based authorization section under the Application tab, add your roles, and set a default authorization for each. When you then configure individual APIs, you can assign them to one or more roles.
What to do if your collection is incomplete or missing auth?
This is one of the more common reasons scans come back cleaner than they should. Everything runs, findings appear in the dashboard, and it’s only later that you realize whole sections of the API were never tested because the collection didn’t include those endpoints, or authentication was missing on routes that needed it.
Before starting, check for requests returning unauthorized responses, endpoints added recently that never made it into the collection, role specific routes that need separate credentials, and tokens that are expired.
Authentication gaps don’t always mean rebuilding the collection. Beagle Security lets you configure auth per endpoint individually, so if a handful of admin routes or tenant specific endpoints need different credentials, you can set those separately without touching the rest of the setup.
Send a few test requests through before running the full scan. If authenticated endpoints aren’t responding correctly at that point, the scan will complete and still tell you very little.
For teams running APIs on Kubernetes or Istio, Beagle Security’s API discovery featurehandles the harder problem which is finding endpoints that were never documented in the first place. It automatically surfaces APIs running in those environments, including ones that are undocumented or have been forgotten over time, and maps them into your test configuration before the scan runs. That’s available on the Enterprise plan.
Reading your results against OWASP API Security Top 10
Once the scan finishes, the next step is understanding what the findings actually mean in the context of API risk.
Beagle Security maps findings against the OWASP API Security Top 10 categories, which groups issues based on the kind of API weakness involved instead of showing a flat list of vulnerabilities. That includes broken object level authorization, broken authentication, excessive data exposure and other API specific risk areas covered by OWASP.
The mapping helps with prioritization too. An exposed debug endpoint and a broken authorization issue may both appear in the results, but they don’t carry the same level of risk. Seeing findings grouped by OWASP categories makes it easier to identify where the larger problems are concentrated before working through the list.
This post focuses on setup and configuration. For a deeper look at specific vulnerability types and how Beagle Security classifies them, the Beagle Security vulnerability index covers them in more detail.
Summing up
At this point, the hard part is already done.
The collection exists, the requests are mapped out, and the authentication flow is probably already working inside Postman. The remaining step is making sure the scanner can use that setup properly instead of rebuilding the API from scratch.
Import your Postman collection into Beagle Security, configure authentication, and validate that the scanner can reach the endpoints it needs. From there, findings get mapped against the OWASP API Security Top 10 so the results are easier to prioritize and act on.
If you want to see how the workflow looks before setting it up yourself, the interactive demo dashboard is a good place to start.
 security tools by category")
![Top Qualys alternatives and competitors [July 2026]](/blog/images/top-qualys-alternatives-cover.webp "Top Qualys alternatives and competitors [July 2026]")
![Best API security solutions for enterprises [2026]](/blog/images/blog-banner-two-cover.webp "Best API security solutions for enterprises [2026]")
![Top Checkmarx alternatives and competitors [July 2026]](/blog/images/top-checkmarx-alternatives-cover.webp "Top Checkmarx alternatives and competitors [July 2026]")

![Top rated DAST tools [2026]](/blog/images/top-rated-dast-tools-cover.webp "Top rated DAST tools [2026]")
![11 best SOC 2 compliance software [2026]](/blog/images/best-soc2-compliance-vendors-cover.webp "11 best SOC 2 compliance software [2026]")
![Top API security vendors [2026]](/blog/images/top-api-security-vendors-cover.webp "Top API security vendors [2026]")
![Top enterprise application security tools [2026]](/blog/images/blog-banner-four-cover.webp "Top enterprise application security tools [2026]")
![Acunetix vs Qualys: Which is the best choice for you? [2026]](/blog/images/blog-banner-six-cover.webp "Acunetix vs Qualys: Which is the best choice for you? [2026]")


